If you are doing all of your app navigation in storyboards, one of the advantages you have surely discovered is that it’s a great way to specify all of the navigation for your app with minimal code. You may run into this catch, though: specifying a segue for forward navigation is straightforward, but what if you want to specify a segue to dismiss a screen, such as the simple case of tapping a Done button to dismiss a modal screen? Suddenly the answer isn’t quite so obvious.
If you search for this on the web, you get all sorts of proposals, from pretty close to just plain wrong:
- Make a regular segue
- This solution is clearly wrong, because you want to remove view controllers from the stack when you dismiss, not add to them
- Dismiss the controller yourself in code
- We’re using storyboards to get our navigation out of code, this defeats our purpose
- Write a custom segue to dismiss your view controller
- This is closer, but is inflexible and makes reuse of your view controllers more difficult as we’ll touch on later
The correct solution for flexible navigation backwards in your storyboards is what is called an unwind segue. The functionality is a little more hidden in Interface Builder than the regular segue — let’s talk about how they work, and how to find and use them in Interface Builder.
Unwind segues work a little bit differently from standard segues, because they need to. Regular segues are normally setup from a control in one view controller to another view controller. Tap the control, trigger the segue, jump to another view controller.
Unwind segues go to a previous screen in your view hierarchy, which means you don’t know the destination of an unwind segue upfront. Now most of the time, that isn’t true, because you only have one pathway back. But if you are reusing a view controller in your storyboard — perhaps it is one of your standard modal screens — you cannot hardcode a view controller for it to dismiss back to.

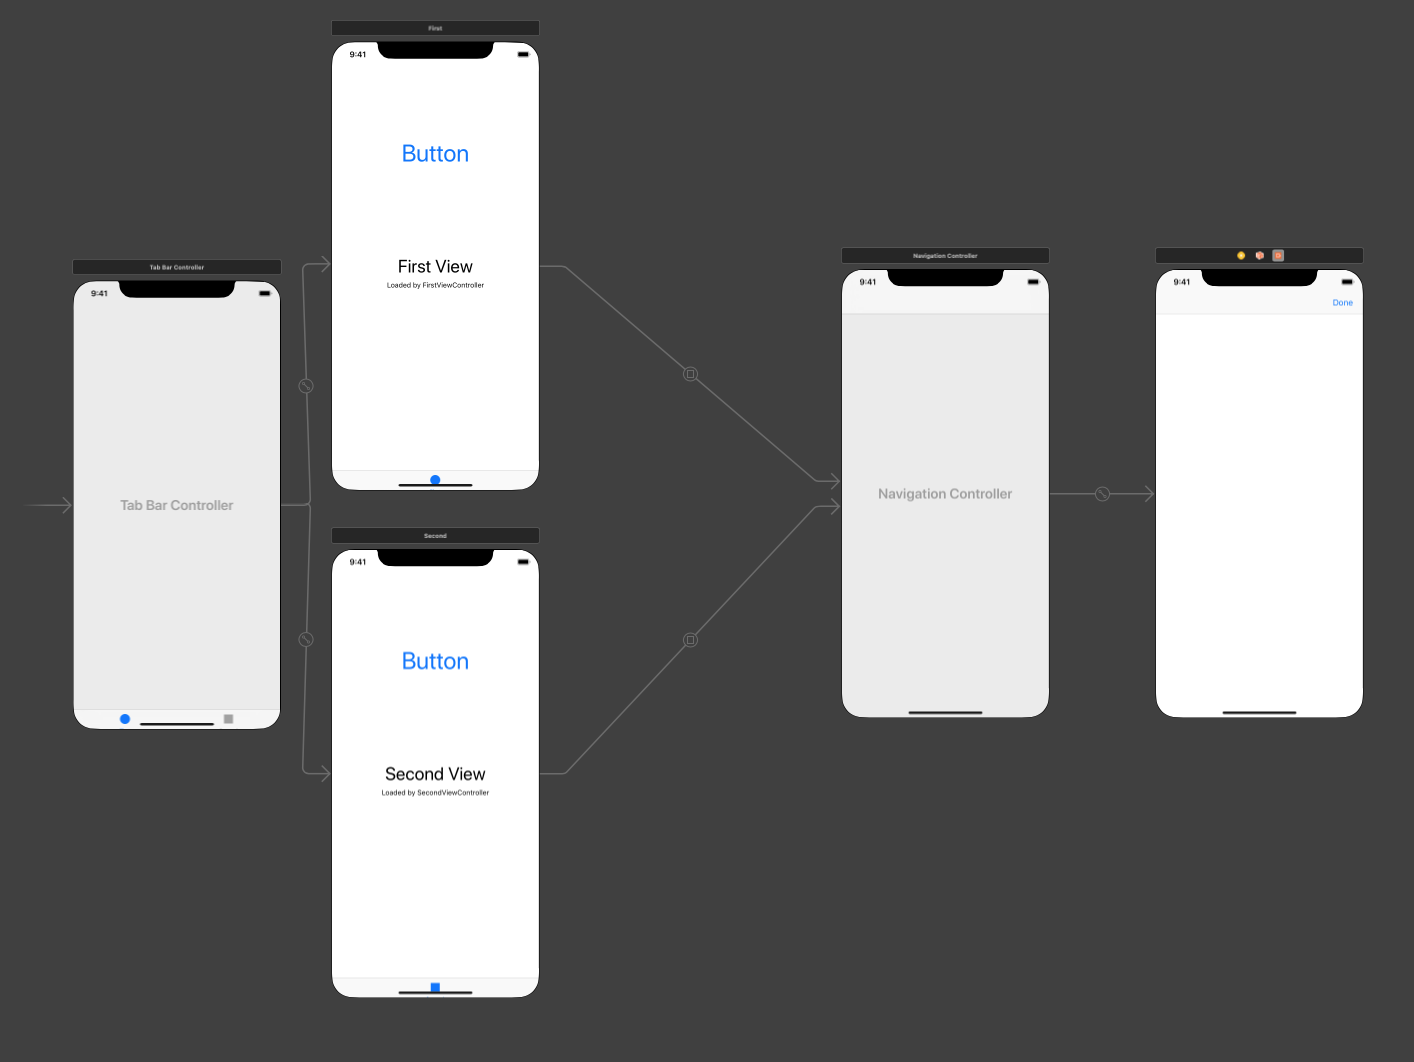
The storyboard example above illustrates this problem. Unwind segues are built to handle that multiple destination problem in a clever way. Let’s talk about how to define them first, and then we’ll talk about that clever mechanism that iOS uses when the unwind segue is triggered to find the correct view controller to navigate back to.
1. Create method to receive unwind segue
Another way unwind segues are different is that you don’t receive them using the usual prepare(for segue: UIStoryboardSegue, sender: Any?) method, because this segue is inverted: it will be processed by the destination view controller, rather than the source. Instead, you define an @IBAction function on the view controller you are unwinding back to.
@IBAction func modalDismissed(segue: UIStoryboardSegue) {
  // You can use segue.source to retrieve the VC
  // being dismissed to collect any data which needs
  // to be processed
}
You will define this method for each view controller which you may want to dismiss back to using this unwind segue. For example, multiple different screens which are sharing the same reusable modal view controller. I’ll address how iOS determines which screen to jump back to later in the article.
Going back to the example storyboard above, both screens will be displaying that view controller, and you will need to unwind back to the correct tab when Done is clicked, so you would add a copy of the above method with the same name to both the First and Second Scene view controllers.
NOTE: The method signature is very important! It must be an @IBAction, and it must take a single UIStoryboardSegue argument, labeled with segue. Any variance from that, and your method will not be recognized as an unwind segue target by Interface Builder, and therefore will not show up in the next step when you try to link it to your control.
2. Connect segue in Interface Builder to dismissing control
Once you have that method defined in at least one of your view controllers, you need to connect the control that will be responsible for dismissing the view controller via triggering the unwind segue.
The easiest way to accomplish this is to select the Exit node in your modal view controller, go to the Connections inspector, and under Presenting Segues, connect the appropriate method to the appropriate control.

You can also Control-drag from the dismissing control’s action outlet to the Exit node of one of the view controllers which implements the unwind segue method. It has the advantage that it makes sure that your segue will unwind correctly (at least for that case), but the first technique is much easier in terms of doing in Interface Builder.
Whichever technique you use, this only needs to be done once, even if multiple screens may be the target of that unwind segue. Why that is is the subject of the next section.
How the unwind segue works at runtime
How the unwind is performed when your control is tapped is how the unwind segue navigates you back to the correct screen. When an unwind segue is requested, iOS walks back through the stack of screens you have presented, looking for a view controller with a method matching the signature configured on your dismissing control. The first one it finds becomes the target of the unwind: the VC’s method is called to process the unwind, and the view controller stack is popped back to that view controller. If no matching method is found, the unwind segue is aborted; if your dismissing control doesn’t do anything, look for a missing or incorrectly named method.
For example, if you have a UITabViewController with two tabs, and both of them want to display the same modal dialog. When you define your unwind segue method on both screens, when your user dismisses the modal dialog, it will return to the correct screen, because that is the first screen it will find on the view controller stack which implements the appropriate method.
Going back to the example storyboard one more time, if you trace back what would happen when you tap the Done button, it would pop back through the view controller stack to the Navigation Controller. That doesn’t implement the appropriate method, so it would pop back to either First Scene or Second Scene, depending on which one the button was tapped from. Because the method is implemented for both, it finds it has an unwind target, calls the method, and then dismisses all the view controllers back to the target view controller.
If you want to experiment with the example app code used for the example above, you can sign up for the mailing list to get a copy of the project ready to unpack on your development machine to work with.
